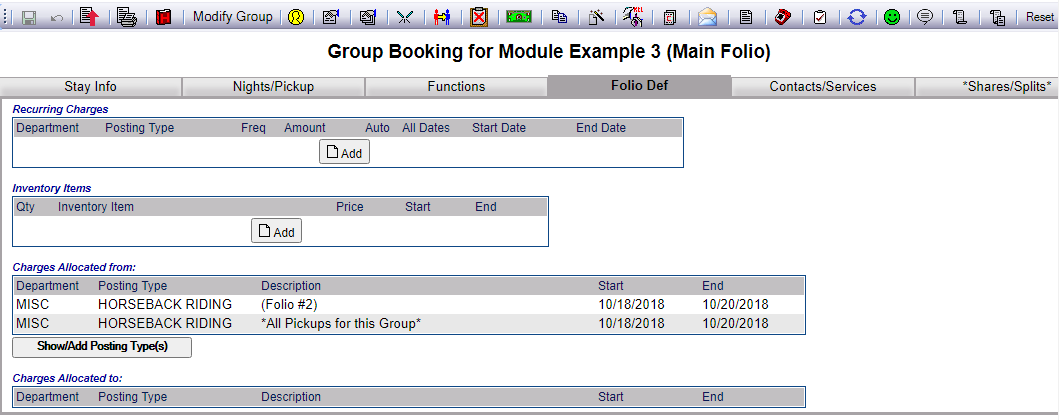
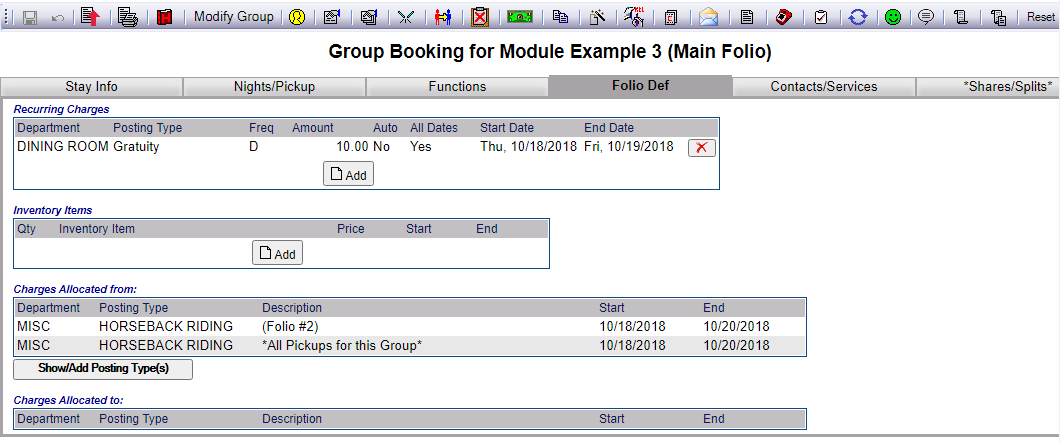
The Folio Definitions or Folio Def tab is the fourth tab of the Group Stay Main Folio screen.
The Folio Def tab allows you to add recurring charges, and re-route charges from one folio to another, provided additional folios have been set up on the Shares and Splits tab.
The Folio/Def tab section looks IDENTICAL to the one found in any Main Folio, containing sections allowing you to add or edit Recurring Charges and Inventory Items, and to allocate Post Types to a different Folio, shown in the sections Charges Allocated from, or Charges Allocated to.
However, whilst appearing identical, the allocation section is USED differently.
THIS is the Folio for the GROUP. By default, your Skyware System will allocate charges to the INDIVIDUALS who book (pick up) the rooms, NOT TO THE GROUP FOLIO.
If you wish to put any/all charges INTO THE GROUP FOLIO, you will need to add them here in this tab.
Keep in mind that defining charges to go to a specific folio on a Group master routes those post types from ALL individuals that have picked up against the block to go to that folio on the group master.
This tab also displays charges that are being sent to another guest under the Room Allocation feature.
NOTE: With a WHOLESALER BLOCK, all of the room charges and room tax will go onto the Group Master Folio by default. The individual Pick ups will be responsible only for any additional charges.
In order to set up additional charges to go to the Wholesalers Group Master, you will use the Folio Definitions tab. Once charges have been defined to go to a folio in the Group Master, all charges for all pick up will go to the selected folio on the master (NOT the individual).
Select Modify Folio from the Action Bar
OR
Click Modify Folio from the Registration section of the Full Menu.
When you select Modify Folio, the Select Folio screen will open.
Currently the screen has no (Stay Information) Folios displayed. There are various options for you to select from.
Note: The default setting for the screen is to have the In-House option box checked. To search for a Group Folio, you will need to de-select this option and select the Group option(s) desired, Groups (In-House) and/or Groups (Resv). This will change the screen to the Select Group screen (which may also be reached using the Modify a Group Block command).
The Select Group search screen allows you to select a Group from those existing in your system to display.
Use the <<Press to Search>> command to search for matching records.
There are several search criteria you can use to narrow your search, including the Company name or the Booking Name used when the Group Block reservation was generated, or you can simply click on the <<Press to Search>> command which will list all the Groups in your system. You can then select the one you want from the list generated.
Note: When entering information into the search fields, you do NOT need to hit return or enter - if you do so, this is the equivalent of clicking the <<Press to Search>> link and will generate the search.
When the matching records are displayed, Click on an entry from the search results list to open the Stay Information, otherwise known as the Main Folio, for your chosen Group.
When selected, the Group Main Folio with the Stay Information tab displayed will open.
Click on the Folio Def tab to open it.
A recurring charge is a charge you want to automatically post (during the night audit) to the group master with a set frequency (each day, week, or month).
To set up a recurring charge, click the Add button in the Recurring Charges area.
This will open the Recurring Charges screen.
Posting Type: This is the Posting Type for this recurring charge. This is a drop-down menu of the available options; select one.
This field is required.
Amount: What is the amount of the recurring charge to be? By default this field is 0.00; enter the amount to be charged.
This field is required.
Frequency: This is a drop-down menu of your available frequency options (daily, weekly, or monthly). Select one. By default the first option, daily, is displayed.
This field is required.
Automatically Posted: This box may appear checked or unchecked, but cannot be altered here, it is information only.
Post for all dates -OR-: This box may be checked or unchecked, by default it is checked, meaning the charge will be posted for all dates of the reservation it is attached to. If unchecked, the fields for adding in specific dates will appear.
You can select from the drop-down menus or click on the calendar icon to specify the dates desired.
Click the Save () button in the local tool bar. This will save the recurring charge and add it to the list of charges displayed on the left of the screen.
When you are done adding charges, click the button Stay Record to return to the Group Folio, where the recurring charge will now be shown.
The charge will now automatically be charged to the Group's Folio during the night audit, based on the frequency selected.
Note: Any charges added/displayed may be clicked directly to take you to the Recurring Charges screen for editing, and will have a "delete" button next to them, which allows you to delete them directly from the Folio.
Inventory items are items that can be added to a room or stay. Maintenance of the available Inventory Items list is performed through the Housekeeping section of Skyware.
To add an item to the Folio from your Property's inventory, click the Add button in the Inventory Items area.
This will open the Room Inventory Items screen (for the Group Folio).
Inventory Item: This is a drop-down menu of the Inventory Items you have available to add. It also tells you the cost of said item you have available to add.
Select the appropriate item to be added.
This field is required.
Description: This field allows you to add a more detailed description of the Inventory Item. By default it will display the name of the Inventory Item, but you may add to this as desired.
Quantity: Type in how many of the Inventory Item will be provided. By default this is set at 1.
Note: This number should not exceed the number available in your Inventory! If it does, when you attempt to save, Skyware Systems will notify you with a pop-up window, telling you by how many you have exceeded the Inventory total, allowing you to correct the error.
Price: Price of the Inventory Item. This is set automatically from the selection of the Inventory Item, but may be altered manually. If need be, type in the amount the Folio will be charged for each one of the Inventory Item supplied.
To the right will appear the TOTAL amount of the charge (Quantity x Price).
Start Date: Select the Date the Inventory Item will begin to be used.
End Date: Select the Date the Inventory Item will no longer be used.
When finished, click the Save button (). This will save the Inventory Item for the group Folio and add it to the list displayed on the left of the screen.
When you are done adding items, click Stay Record to return to the Group Folio screen.
Again, any Inventory Items added/displayed may be clicked directly to take you to the Inventory Items screen for editing, and will have a "delete" button next to them, which allows you to delete them directly from the Folio.
Charges Allocated To:
The Group Folio Def tab allows you to determine what charges will be re-routed from the individuals (picked up against the group block) to the Group. This is also called Posting Type Allocation.
When a Pick up occurs any charges are made to the INDIVIDUAL reservation Folio, not against the Group Master Folio.
You can change this and apply specific charges to the Group Folio, by selecting Posting Types to have allocated to it. If Post Types are defined to go to a specific Folio at the Group level, those Post Types for all guests picked up against the Group block will go to the Group master.
This is all based on what Post Types are defined in the group master's folio definitions. For example, if you have a Group where the sleeping room charges will be billed to the Group master, using the group master's Folio Definitions tab will allow you to select ROOM CHARGE from the Posting Type Allocation screen to be allocated to the Group master's main folio. This would then mean that ALL the room charges for ALL of the individual stays picked up against the group will be posted to the group master (not on each individuals' folios).
Using the Folio/Def tab of the Group Main Folio, you can see which, if any charges have been allocated To the Group.
To add to this, or edit any already added, you will need to click on the Show/Add Posting Type(s) button.
Clicking on the Show/Add Posting Type(s) button will open the Posting Type Allocation screen.
This screen shows on the left the list of all possible posting types that can be allocated, with a check box next to each to allow it to be selected.
Note: Any pick ups already made will be displayed in a list on the right - if none have been made yet, this section will have no entries.
You can use the Select Department drop-down list to filter the posting list by department, and/or the Select All button to select all Post Types in the Department you are viewing.
Check a box beside the desired Posting Type and click the orange button Save to add it to the Group Folio.
This will then display the Dates for the Start and End of said addition; by default these will be the span of the Group Block booking.
Select the Date range you wish this Posting Type charge to be allocated to the Group Block for. This may be for part or all of the Group Block time period. You can change the dates so a certain posting type is only covered by the group Folio for certain dates.
NOTE: Once you define Post Types to be routed to the Group master, that will force the charges from all individuals picked up against the group to be re-routed and charged to the Group master.
You can also choose to have this Posting Type charged to the Group Folio for only SOME of the Pick ups attached to it.
This is where the right hand side of the screen is used.
All current Pick ups for this Group are listed here.
You may select which Pick ups have the posting type charge moved from them to the Group Master.
Select each Pick up that the allocation will affect by checking the check box to the left of their confirmation number.
If NONE are selected, ALL allocated posting types for ALL pickups will be redirected to the group master.
Again, click the orange button Save if you selected any Pick ups to allocate the charges for to the Group Folio.
Once you have clicked Save and completed any allocations to the Group Folio, you will see the message "Posting Type(s) have been allocated!"
When you have finished allocating charges to the group Folio, you should click the orange button Back to Stay to return to the Group Main Folio screen.
The Folio screen will be open on the Folio/Def tab, and you will now see any allocations you have added to the Charges Allocated from Section, with their Start and End Dates also displayed.
Note: To REMOVE an allocated charge you will need to return to the Posting Type Allocation screen and de-select the particular Posting Type (by un checking the box next to it). After saving and returning to the Folio screen as before, you will now see that the posting type is no longer displayed in the Charges Allocated from Section.
Charges Allocated From:
this is the Re-allocation of charges.
This refers to sending postings to a Folio other than the Main Folio. See Posting Type Allocation. The Folio in question MUST have at least one split, other than the Main Folio, for this to be possible.
Each Stay record can have an unlimited number of Folio "splits" (set up under the Shares/Splits tab of a stay). Once additional Folios have been set up, you can pre-determine what post types (charges) should go to which folio. By default you will always have a "Main" Folio.
Once additional Folios have been set up, they appear in the list located to the left of the main Folio Definitions tab screen.
Using the allocation function along with the configured Folios, you can pre-determine what post types (charges) should go to which Folio.
By default all charges go to the "Main" Folio.
To send new postings to a Folio other than the Main Folio:
From the folio list on the left, select the folio you want the charges to be routed TO (For example, Folio#2).
Now click on the Show Add Posting Types button in the Charges allocated from section of the tab.
The Posting Type Allocation screen will open, showing the Folio to Allocate TO displayed at the top
Again, use the checkboxes to identify which post types you want to be automatically charged to the folio you are currently viewing (the one you originally opened the folio for). You can use the Select Department drop-down list to filter the posting list by department, and/or the Select All button to select all post types in the Department you are viewing.
Once all the relevant post types to re-allocate have been selected, click the orange Save () button. The charges will be automatically charged to the folio you are currently in.
Once the Post Types have been allocated to and from a particular folio, they appear in the appropriate allocation lists on the Folio/Def tab.
If you allocate a charge FROM a particular Folio Split, it will display in the Charges Allocated FROM section of the Folio Definitions tab screen for that split.
Note: In the OTHER Folio Splits it will display in the Charges Allocated TO section, with details from where it came.
Date Updated January 29, 2024